Quick and Easy Case Sensitive Drive in MacOS
One of my projects involves Google AdWords. I was dealing with ad groups in AdWords and I realized I had made a few case mistakes with the filenames. I had files named Adgroup.php instead of AdGroup.php. I went and changed the file name, but, since my project is managed with git, I couldn’t commit the changes. My Mac drive was not case sensitive. Oops, forgot about that.
A quick note: I chose solution #3 when writing this, but even after a few hours of testing, I might be not suggesting this solution anymore. I’ll update this in about a week or so.
Solution 1
The cheap, less cool solution.
The first solution is to create a disk image on the Mac, using Journaled Case-Sensitive filesystem format, and mounting that with your project files. When you restart your Mac, you’ll need to mount it again (or, you can make this part of your start-up mechanism.)
Solution 2
You can re-partition your main disk to have two drives, one that is your normal one and one that is case sensitive. (Do not redo your entire drive, because sadly some Mac products will freak out on case-sensitive drives.) But, this method gets rid of some of your available storage, permanently.
Solution 3
What I did!
I don’t actually know if this is going to be a good solution, or not. I know that SD cards are much slower than my SSD, but I thought it’d be worth trying this out. I will issue an updated entry if this turns out to be a “bad idea.”
I wanted to solve this problem, but I also wanted to add extra disk space to my Macbook Pro, too. I came across the Minidrive (by Nifty) - it basically allows you to add additional storage to your Mac using a MicroSD. I ended up installing a 128 GB SanDisk microSD card to add the additional storage.
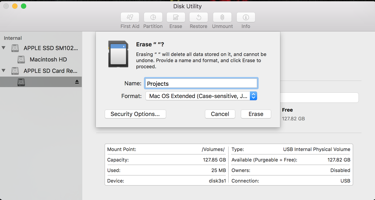
When you first install it, it will appear as a mounted volume, but in whatever format your SD card came in. To convert this to the proper format, do the following:
- Open the Disk Utility application
- Right click the new drive below the Apple SD Card Reader
- Choose Erase
- Type a name for your new disk and choose Mac OS Extended (Case-sensitive, Journaled) format.
- Click Erase
After a few seconds, you should have your new drive mounted and ready.
Let’s test it out. In my case, my drive is named ‘Projects’ and is mounted in MacOS in the /Volumes directory.
cd /Volumes/Projects/
touch test
touch Test
ls
The output is:
Test test
So I know now that my drive is case sensitive.
There’s no real reason why I have all my code in the ~/Sites folder - I’m using containers and virtual machines, but that’s where I have it.
I want to move all of my projects from my Sites folder to this new drive. (Keep in mind, with the updated filesystem that they’re going to, some of the projects might need some tweaks then. Perhaps you have some case-insensitive code that will need to be updated. This is a little headache now for a lot of benefit in the long run.)
mv ~/Sites ~/Sites_backup
ln -s /Volumes/Projects ~/Sites
mv ~/Sites_backup/* ~/Sites
rm -rf ~/Sites_backup
First, we move our data to a different folder. Then, make a symbolic link from your volume to the location that you’d like to keep your files. I want to stay with my Sites folder name. Finally, move all the content from your back up file to your new drive (and delete the backup folder). Please note that this may take a while, depending on the size of your files. You are moving from one drive to another.
I don’t like being cavalier with my files, and I was a little bit nervous to do this because I haven’t fully tested out this process. However, all of my project files are in version control (except for any “user content” I use during testing), so I’m not worried.
Cleaning Up / Streamlining the Setup
There are a few down-sides to this method (I can’t seem to get the Sites folder icon to return to the same that it was before, for example.) But one that I can solve: having the Projects icon on the desktop by default. I wanted that gone.
- Open a Finder window
- Choose the
Findermenu, choosePreferences - On the General tab, de-select
CDs, DVDs and iPodsif it checked.
This will also hide your CDs and iPods if they’re attached… but for me, that’s not a big deal.
Downsides
I can already tell the speed. On the SD card, using Jekyll to compile this blog takes about 29 seconds. On the SSD directly, it takes 16 seconds. A set of 987 unit tests with PHPUnit take 19 seconds on the SSD, but are taking about 28 seconds on the SD card.
Second, SD cards are known to use up battery life (I also notice that my fan seems to be spinning up a little bit more, too.)
A final, really silly issue: When you’re on the command line and you try to cd to a folder using tab auto-complete, it puts the trailing slash at the end. With a symbolic link, it does not. You don’t need the trailing slash for the change directory command to work, though. But most other places, when you tab and there is no trailing slash, it tends to indicate that there are multiple matches. In this case, there is not one.
The End
Hopefully in a week or so, I’ll revisit this and see if this was a good idea. :)
